The Solar Installation Process: What to Expect from Start to Finish
- Hyde Source

- Jul 28, 2025
- 4 min read
Deciding to go solar is a significant step towards energy independence and a sustainable future. While the benefits are clear- reduced electricity bills, a smaller carbon footprint etc., the installation process itself might seem daunting. What exactly happens from the moment you decide to go solar until your system is up and running?
Understanding each stage of the solar installation process can help demystify the journey, allowing you to approach your solar project with confidence. Here's a comprehensive guide to what you can expect from start to finish.
Stage 1: Initial Consultation & Site Assessment
This is where your solar journey begins.
Initial Inquiry & Consultation: You reach out to us. Our team will discuss your energy needs, current electricity bills, and motivations for going solar. They'll provide a preliminary overview of solar options, potential savings, and available incentives.
Site Assessment (Remote or On-site):
Remote Assessment: Often, an initial assessment can be done using satellite imagery and your electricity consumption data to determine roof suitability, shading, and preliminary system size.
On-site Assessment: For a more detailed evaluation, we will visit your property. We will:
Inspect your roof's condition, angle, orientation, and available space for panels.
Assess shading from trees, chimneys, or neighboring buildings throughout the year.
Examine your electrical panel (main service panel) to ensure it can handle the new solar load and connections.
Gather structural information about your roof to ensure it can support the weight of the solar panels and mounting system
Confirm your average energy consumption to accurately size the system.
Stage 2: System Design & Proposal
Based on the site assessment, we will design a customized system.
Custom System Design: We will design a solar PV system tailored to your energy consumption, roof characteristics, and aesthetic preferences.
This includes:
Panel Layout: Determining the optimal placement and number of solar panels.

Solar Panel Layout for a 25kW Setup Inverter Selection: Choosing the right type and size of inverter (string, micro, or hybrid) for your system.
Mounting System: Selecting the appropriate racking system and material (e.g., aluminum, MS, galvanized steel, Galvalume etc.) for your roof type and local climate.
Wiring Diagram: Planning the DC and AC wiring pathways, including the placement of DC and AC junction boxes (combiner boxes) and ensuring proper cable sizing .
Optional Battery Storage: If you opt for battery backup, the design will integrate the battery system (e.g., SMF or Tubular).
Detailed Proposal: You'll receive a comprehensive proposal outlining:
The proposed system size (kW) and estimated annual energy production (kWh).
The specific solar panels, inverters, and other equipment to be used.

STAAD Pro Wind Load Design for a 80kW Solar Plant The total cost of the system, including all components, labor, and permitting fees.
A breakdown of potential savings, payback period, and ROI.
Information on available subsidies, tax credits, and financing options.
Warranty details for equipment and workmanship.
Stage 3: Approvals & Permitting
This stage involves navigating local regulations.
Permit Applications: We will handle all necessary paperwork for solar installation permits and utility interconnection agreements (e.g., net metering application). This can be a time-consuming step, as approval times vary by jurisdiction.

Power Purchase Agreement (PPA) between Consumer and DISCOM Structural Engineering Review (if needed): For some installations, especially larger ones or those on older roofs, a structural engineer may need to review and approve the roof's capacity to bear the solar system's weight.
Stage 4: Procurement & Installation
This is where your solar system comes to life.
Equipment Procurement: Once permits are approved, we will order all the necessary equipment.
Installation Day(s): The actual installation typically takes 1-3 days, depending on the system size and complexity.
Mounting System Installation: The racking system is securely attached to your roof.

Panel Installation: Solar panels are carefully mounted onto the racking.
Electrical Wiring: DC wiring connects panels to the inverter, and AC wiring connects the inverter to your electrical panel and the grid. This includes installing junction boxes and ensuring all connections are safe and compliant.
Inverter & Battery Installation: The inverter (and battery, if applicable) is installed in a suitable location (e.g., garage, utility room, or outdoors).
Conduit & Wiring Runs: All wiring is neatly run through conduits to protect it from the elements and ensure safety.
Initial Inspection: We will perform a thorough check to ensure everything is correctly installed and functioning.
Stage 5: Final Inspections & Grid Connection
The final steps before you start generating power.
Local Authority Inspection: A local electrical inspector will visit your property to ensure the solar installation complies with the grid requirements.
Utility Interconnection: Once the local inspection passes, the utility company will perform its own inspection and install or activate your net meter. This is the final step that allows your system to be connected to the grid and begin sending excess power back.

Solar Synchronized Net Meter System Activation: After all inspections are passed and the utility grants permission to operate , we will activate your system. You'll then officially start generating your own clean electricity!
Stage 6: Monitoring & Maintenance
Your solar journey continues after activation.
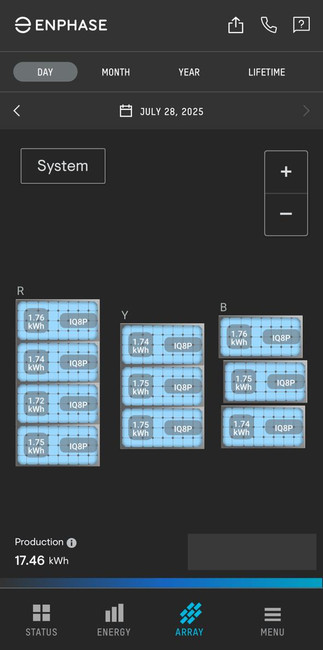
Performance Monitoring: Most modern solar systems come with monitoring capabilities (often via a mobile app or online portal) that allow you to track your system's real-time energy production, consumption, and overall performance. This helps you ensure your system is operating optimally and identify any potential issues.
Ongoing Support & Maintenance: We will provide ongoing support, including troubleshooting, warranty claims assistance, and recommendations for periodic maintenance (e.g., cleaning, inspections). While solar panels are durable, occasional checks ensure their long-term efficiency.


Conclusion
The solar installation process, from initial consultation to system activation, involves several distinct stages, each with its own set of activities and requirements. While it might seem like a lot, we will guide you through every step, handling the complexities of design, permitting, and installation.
By understanding what to expect at each phase, you can embark on your solar journey with confidence, knowing that you're well on your way to enjoying the numerous benefits of clean, renewable energy for decades to come.