From Silicon to Solar Panel
- Hyde Source

- Aug 6
- 3 min read
The manufacturing of a solar panel is a multi-stage process that transforms raw silica sand into a powerful, electricity-generating device. This complex journey involves a series of high-precision chemical, electrical, and mechanical engineering steps.
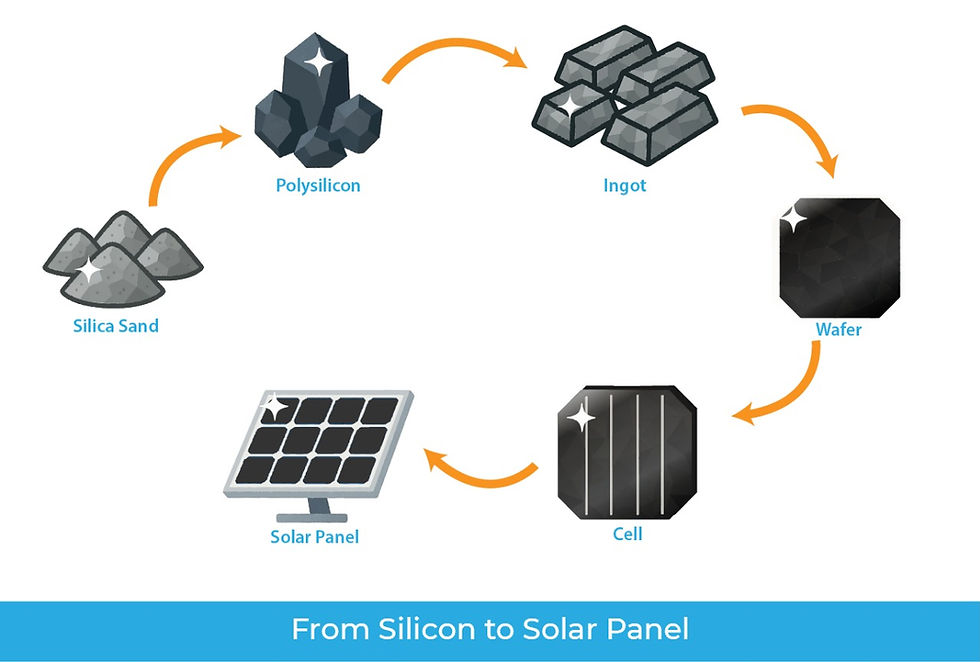
Here is a step-by-step breakdown of how a solar panel is made, from silicon to cell to the final panel.

1. From Silicon to Wafer: The Foundational Stages
a. Silicon Purification
The process begins with quartz sand, which is a form of silicon dioxide (SiO2). This sand is heated in a furnace with carbon at extremely high temperatures (over 2,000°C) to produce metallurgical-grade silicon, which is about 98% pure.
This isn't pure enough for solar cells, so the silicon is further refined using a chemical process, most commonly the Siemens process. This involves converting the silicon into a gas (trichlorosilane), which is then purified through distillation and chemical vapor deposition. The result is highly pure polysilicon (polycrystalline silicon) with a purity of up to 99.9999999%.
b. Ingot and Wafer Formation
The purified polysilicon is melted in a high-temperature crucible. From here, the process branches depending on whether the final product will be mono-crystalline or poly-crystalline.
Monocrystalline: A single, small silicon seed crystal is dipped into the molten silicon. It is then slowly pulled up while being rotated. The molten silicon solidifies around the seed, forming a single, large, cylindrical crystal called an ingot.
Polycrystalline: The molten silicon is simply allowed to cool and solidify in a square-shaped mold. As it cools, multiple silicon crystals form, giving it a characteristic grainy, speckled appearance.
Once formed, these large ingots are sawed into thin, square blocks called bricks, and then sliced into extremely thin disks known as wafers using a diamond-coated wire saw. The wafers are then polished and cleaned to prepare for the next stage.
2. From Wafer to Cell: The Core of the Process
The silicon wafers are now ready to be transformed into functional solar cells through a series of fabrication steps:
Texturing: The wafer surface is etched with a chemical bath to create a rough, pyramid-like texture. This reduces light reflection and increases the surface area, allowing the cell to absorb more sunlight.
Doping (P-N Junction Formation): The wafer is "doped" with different elements to create a positive-negative (P-N) junction, which is essential for the photovoltaic effect. A layer of a negatively-charged element (like phosphorus) is diffused onto the top surface of the positively-charged silicon wafer (doped with boron), creating an electric field.
Anti-Reflective Coating: A thin, anti-reflective coating (typically silicon nitride) is applied to the front of the cell. This coating reduces light reflection even further, allowing more photons to be absorbed.
Metallization: Thin metal contacts (usually a silver paste) are screen-printed onto the front of the cell to form a grid-like pattern. A full metal layer (often aluminum) is applied to the back. These contacts collect the electrons generated by sunlight and allow them to flow as an electric current.
3. From Cell to Panel: The Final Assembly
The individual solar cells are now ready to be assembled into a durable, weather-resistant solar panel (also called a module).

Stringing and Tabling: Individual solar cells are interconnected in a series using thin metal ribbons (tabbing) to form a "string." This process is typically automated to ensure precision.
Lamination: The strings of cells are laid out on a sheet of tempered glass, followed by a layer of a clear polymer called EVA (Ethylene Vinyl Acetate). Another layer of EVA and a protective backsheet are placed on top, sandwiching the cells.
Encapsulation: The entire assembly is heated and vacuum-sealed in a laminator. This process melts the EVA, which fills all the gaps and creates a durable, weather-tight seal that protects the cells from moisture and mechanical damage.
Framing and Junction Box: Finally, an aluminium frame is sealed around the edges of the laminated stack to provide structural strength and protect the glass.
A junction box is attached to the back, which houses the bypass diodes and provides the electrical connections for the entire panel.
After final quality assurance and electrical performance tests, the solar panels are packaged and ready to be installed.
Ready to go solar? We're here to help! Reach out to our experts today for a personalized discussion about your specific requirements. We'll craft the ideal solar system that perfectly fits your needs and budget.


